The fruit season has begun, and quite naturally, friends, colleagues and relatives begin to brag about the harvest. Many immediately want the same, and they begin to plan autumn and spring plantings. But the result of these plantings (if there is where to plant) will not be visible soon. And it is good if it does not involve a wrong variety or infected planting material. But there is a very good solution – grafting. In the summer, this can also be done quite well, and in different ways. The article will be about summer grafting: why, when, what with what and how in the simplest way.

The main question is: why get vaccinated?
There are many reasons and if you study them carefully, the urgent need to master the vaccination process becomes clear. Especially since there is nothing complicated about it.
1. The most important thing is that the garden is not rubber! It is absolutely not able to accommodate everything that you want to have. But having several basic trees – preferably stable, healthy, fruitful – you can significantly expand the range of fruits on a particular plot.
2. An important point: pollinators for self-sterile (and even for self-fertile ones they significantly increase the yield). One tree with different grafts is quite capable of not only producing different fruits, but also pollinating all this diversity on its own.
3. Increasing the diversity of varieties on one tree helps to extend the period of consumption of fresh fruits, expand the palette of flavors and avoid a one-time flood of fruits of one variety.
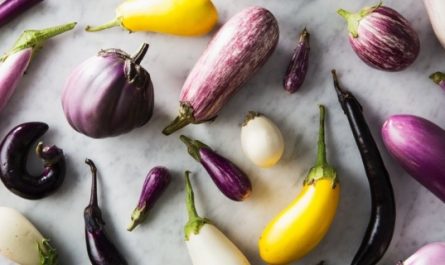
4. On one tree, you can increase both the number of varieties and the number of species. An apple tree, for example, will accept a pear and a quince, a plum tree will accept a cherry plum, an apricot, and a felt cherry.
5. A very significant advantage is that grafting into skeletal branches allows you to relatively quickly change varieties you don’t like or have grown tired of. Cut off a branch and graft something new.
6. Grafting ornamental trees and shrubs (for example, lilacs) during flowering will delight even the most skeptical.
When can you vaccinate?
In general, grafting can be done at any time. In nurseries, winter or table grafting is common, when the plants are dormant and there is a lot of free time. In this case, autumn digging of young seedlings and late autumn preparation of cuttings are required – all this should be stored in winter at a temperature of about 0 ° C.
In spring, grafting is done at the beginning of sap flow and before the buds begin to open. Almost all grafting in our garden is done in early spring, using purchased cuttings.
At the end of May or June, depending on the region, you can graft growing young shoots when they reach a size of 25-30 cm. At this time, cherries and sweet cherries are well grafted, which are very “capricious” when grafted in early spring.
Summer grafting with a cutting differs from spring grafting in that for summer grafting, fresh growth with a part of last year’s wood is taken. This part (last year’s wood) should be very small, about 1,5-3 cm, but it is indispensable – this is where the wood tissues necessary for fusion are finally formed. The grafting technology is almost completely similar to spring grafting with a cutting. The differences are in the removal of leaves on the young shoot (the petioles remain) and the soft grassy top. In about two weeks, the buds on the cuttings will begin to bloom, giving rise to new shoots.
Budding, or summer grafting with a dormant bud, is performed from mid-July to mid-late August in the central zone. In southern or cold regions, these dates will shift accordingly. This option is good for cases when you can take a cutting for grafting from neighbors, friends, relatives or colleagues, having tried the fruits and become inspired to grow the same. It is distinguished by its simplicity of execution and great savings on grafting material – only one bud is required. Even the most greedy gardeners will definitely share one branch. Grafting is better suited for young seedlings or skeletal branches, about the thickness of a pencil. The only downside is that the bud will start growing only next year, because it is dormant!
Cuttings can be used for grafting in the fall, when the leaves have fallen and the trees are ready for winter. But this is quite risky – winter is often dangerous for trees.

What and where to vaccinate?
An important question, because it is impossible to graft a cherry or plum onto an apple tree. After all, the plants must belong to the same genus, or even better, species.
Beginners should graft an apple tree onto an apple tree or a pear tree onto a pear tree. If there is an apple tree or a pear tree with boring fruits on the plot, and your friends have an apple tree with huge tasty apples or a pear tree with juicy bright pears – why not graft what you like? The only limitation in this case may be the fruiting period of the tree – the graft should be with an earlier fruiting period. Or the same. Because if you graft a late variety into the skeletal branch of an early apple tree, the apple tree will experience cognitive dissonance: it’s time to prepare for winter, but here on some branch the fruits have not yet ripened. It can end sadly.
Cherry accepts cherry and dukes (hybrids of cherry and sweet cherry), but rejects felt cherry or sand cherry. Because they are much closer in origin to plum and cherry plum, and are grafted there.
Cherry accepts cherries and dukes, but is not friends with the rest.
The friendliest plant is plumPlums (domestic and Chinese), apricots, peaches, nectarines, felt cherries and even decorative louiseania are well grafted onto it.
Plum It is also good; apricot, cherry plum, felt cherry and louiseania are grafted onto it.
Among the decorative plants, a fruitful experimental plant for beginners is lilacIf you cut cuttings of exclusive varieties in accessible places and graft them onto your plants using budding, you can get something magical as a result.
We are grafting for the fifth season. On the early apple tree, two varieties bear fruit in addition to the base, on the middle one – four, on the late one – also two. On the sweet cherry, several varieties bear fruit, on the cherry tree, in addition, cherry and duke, on the peach – black apricot, red-fleshed peach and nectarine, on the plum – cherry plum and other varieties of plum. Ornamental louiseania is grafted into the crown of the plum – very beautiful! The apricot grafted onto the plum has grown huge, but it cannot bear fruit – the third flowering season falls under the spring cold snap. It needs to be re-grafted onto something that wakes up late.
, apricots, peaches, nectarines, felt cherries and even decorative louiseania are well grafted onto cherry plum.")


How to do it?
It’s too late to graft with cuttings now, I’ll describe the simplest late summer budding with a shield, quite accessible even to beginners. And then it will go by itself.
It is better to cut the cuttings that will be grafted no later than a day or two before grafting and keep them tightly wrapped in cellophane in the refrigerator. Cuttings are cut from mature young growth (when the upper bud has finished growing).
For beginners, it is a good idea to have a thick aloe leaf on hand to cover the cuts with pulp if everything cannot be done quickly. The surfaces of the cutting and scion grow together best if the cuts have not had time to oxidize in the air, that is, the time it takes to make the cuts and join is about 30 seconds. To increase it, you need an aloe leaf: aloe pulp is applied to the prepared cut on the branch, secured and waits while the grafting specialist struggles with cutting out the shield.
The technology of summer budding with a shield seems the simplest, but in fact it requires some skill or the participation of an assistant. Children can also be involved in this operation.
• Prepare all the necessary tools and materials: a stationery knife; an aloe leaf, from which the skin should be cut off by 3 centimeters, exposing the pulp; a ripe stalk in a jar of water; electrical tape for tying. You can use FUM tape, it is even easier with it.
• A cloudy day is preferable for grafting; in hot weather, it is better to perform grafting in the evening.
• On a skeletal branch of a tree, located in the middle part of the crown, closer to the trunk, on its side surface make a transverse cut in the bark, retreat 2,5-3 centimeters to the outer part of the crown and carefully cut the bark to the transverse cut with a small part of the wood. The shield will be inserted here. It is better if the branch is not thick – from the thickness of a pencil to a centimeter.
• Now you need to cut a bud from the cutting (cut off the leaf, leave the petiole) with a piece of bark and wood of exactly the same shape, attach it to the cut on the branch and tie it with FUM tape or the non-stick side of electrical tape, trying not to move the shield, but also not to tighten it too much. Here you may need an assistant – to hold the shield with the bud when tying. The bud and the petiole of the leaf should be free from the tying.
That’s it, basically. It’s hard to make even cuts. To get the hang of it, it’s a good idea to practice on sticks first, then the operation will be really easy. The bud and rootstock will fuse together within 15-25 days. That is, after about a month, the bandage should be removed, otherwise it will interfere with the wood growth. If the bud doesn’t take root, it will simply fall off, but that rarely happens. The survival rate of such grafts is high.
 with a piece of bark and wood of exactly the same shape, attach it to the cut on the branch and tie it with FUM tape")
This grafting option is attractive not only because of its simplicity, but also because it does not require good separation of the bark from the wood, as in the case of grafting behind the bark. And the place of fusion looks quite neat.
It may seem simpler to someone, you have to try. I highly recommend everyone to master this simple operation.